
Preview in:
Face Search in OSINT
OSINT and face search are inherently connected. OSINT refers to collecting data from open, publicly available sources. Face search works on the same principle: it only finds images of faces that are already available online. It adds an extra layer to OSINT investigations, making it easier to find and process information about any person whose data is available online.
Face Search vs Other OSINT Tools
Traditional OSINT tools are usually based on keywords, usernames, email addresses, phone numbers, domains, or other text-based identifiers.
Face search works differently. Instead of relying on written information, it uses an image of a person’s face as the search input. This makes it especially useful when there is little or no text-based information available. For example, if you only have a photo of someone, face search can help find other publicly available images of that person online.
Who Can be Found?
Face search can support investigations involving people featured in news reports, public appeals, court-related coverage, wanted notices, scam reports, fake profiles, catfishing cases, or identity misuse cases.
Face Search in OSINT: Best Tools
If you are considering using facial search in your OSINT investigations, you are in the right place! We will show you two best tools that can be helpful in your OSINT investigations.
Lenso.ai
Lenso.ai can be easily used in OSINT investigations. It is simple to use, but it also offers advanced features that take it to a whole new level. While other face search platforms can help find faces online, lenso.ai provides additional tools that make the research process more precise and efficient.
These include:
- search categories,
- alerts,
- API access,
- Filters & sorting,
- Research Mode and advanced filters,
- and more.
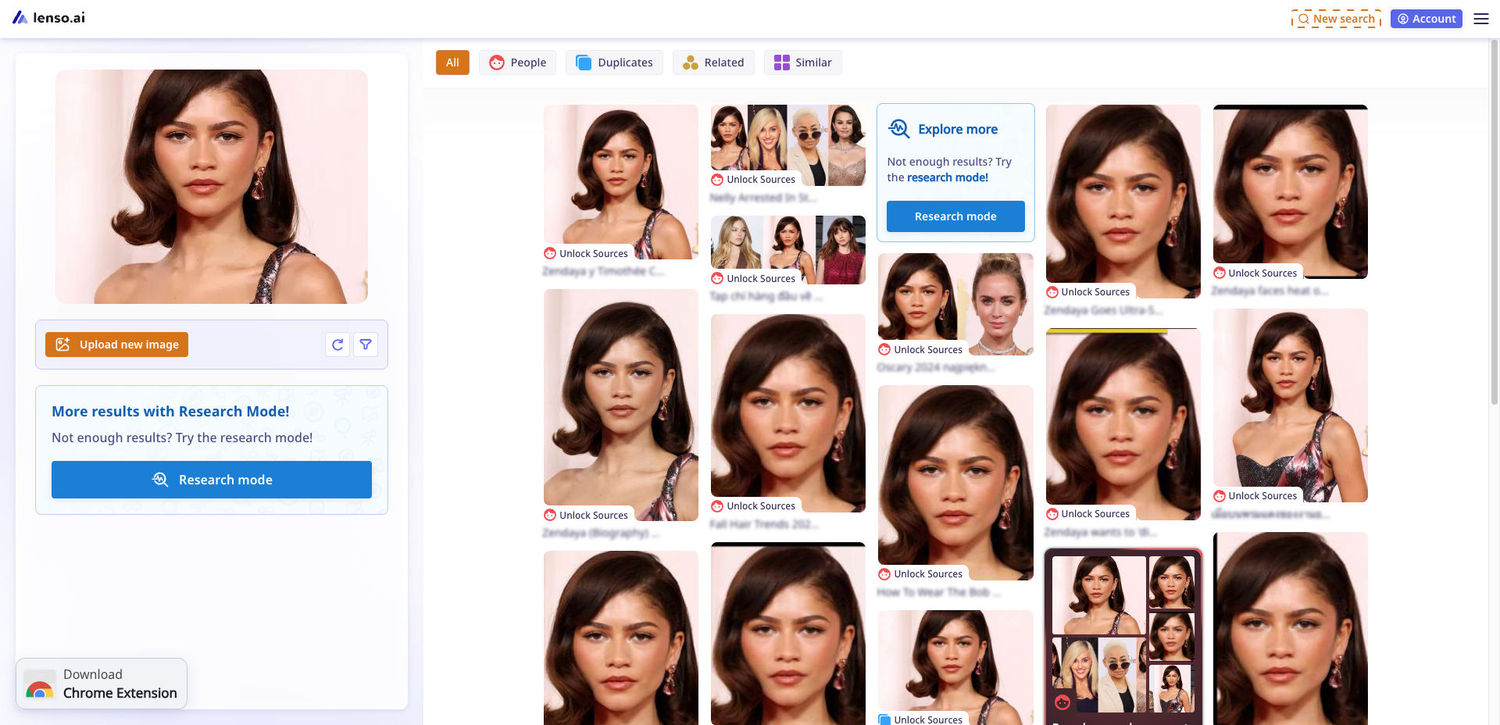
With lenso.ai, you can find people on police and news websites. Try it for free to find out!
How to use lenso.ai?
- Go to lenso.ai.
- Upload an image into the search tool.
- Wait for lenso.ai to analyze the image and generate search results from publicly available online sources.
- For OSINT and face search purposes, choose the People category to look for publicly available images of the same person.
- Explore other categories if needed, such as Duplicates, Similar, or Related, depending on the type of information you want to find.
- Use filters and sorting options to narrow down the results and make your search more precise. **Tip: You get more sorting options in Research Mode.
- For more advanced investigations, use features such as Research Mode, alerts, or the lenso.ai API.
- Review the results carefully and verify any findings with additional open-source information.
Pixalytica
Pixalytica can be used for OSINT investigations, identity verification, and risk assessment. The platform is based on face search technology and allows users to generate reports using only a photo of a person’s face.
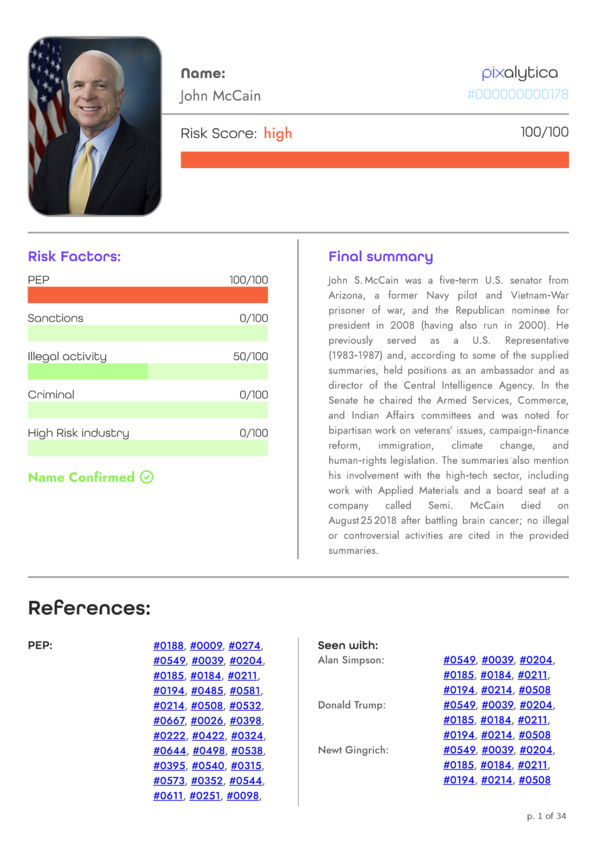
Unlike standard reverse image search tools, Pixalytica focuses more on background checks and KYC-related investigations. It can help analyze publicly available information connected to a person, including online appearances, possible associations, risk indicators, fraud-related mentions, sanctions, and other publicly accessible data.
Pixalytica may be useful for law enforcement, fintech, cybersecurity, fraud prevention, employee background screening, and general OSINT workflows, especially in cases involving fraud prevention or identity verification.
With Pixalytica, you can generate a face-search-based report and use it as an additional source in your investigation. As with any OSINT tool, the results should always be reviewed carefully and verified with additional open-source information.
How to use Pixalytica?
- Go to Pixalytica.
- Open the demo page or log in to your account and request verification to be able to generate reports.
- Upload a clear image of the person you want to verify.
- Enter the required contact details if you are using the demo report.
- Wait for Pixalytica to process the image and generate the report.
- Review the available information, such as online appearances, possible risk indicators, associations, or public mentions.
- Use the report as part of a broader OSINT investigation.
- Verify any findings with additional open-source information before making conclusions.
Facial Search and Background Checks in OSINT
Have you tried facial search in your OSINT investigations? If not, it’s a good time to start! Try it now!

Author
Kinga Jasinska
Marketing Specialist
Continue reading

News
The Best Tools for Marketing & Content Creation in 2026
Explore our list of the most powerful tools that help with marketing and content creation. From image and video generation and design to content discovery and copyright management, these tools are a great help for any marketing team. This article contains a full list of the best marketing and content creation tools for marketing specialists and product designers.

News
Best Free Google Image Search Alternatives in 2026 - Find your image match!
If you're tired of Google’s reverse image search not being as effective as it could be, it's time to explore some alternatives. Let’s find the perfect image match with the top free image search tools of 2026!

News
How to Find Where Your Face Appears Online — and Reduce Your Personal Data Exposure
Understand why personal data protection is crucial for safety. Learn how data privacy, compliance, and best practices safeguard sensitive information from breaches.

News
7 ways reverse image search can save your vacation
Summer is the perfect time to plan a vacation, but unfortunately there are plenty of scams, misleading information, and fake reviews that can lead you in the wrong direction. As a result, you may come back from your vacation even more frustrated than before. Let’s check how reverse image search can save your vacation once and for all!
